
OAuth2
OAuth2 is a protocol allowing applications to authenticate with the BoldSign API, and the security implementation is based on the OpenID Connect framework. To obtain an access token and make calls to the API, you can use any of BoldSign's supported OAuth2 authentication workflows, such as Client Credential or Authorization Code Grant.
Create OAuth2 application
In this type of authentication method, you can use an application and an individual user's login credentials to obtain a token. Then, you can use that token as credentials within your application for API requests on behalf of that user or as a specific user.
Prerequisites
To work with the BoldSign API, make sure the API is available as part of your BoldSign Pricing plan.
You should be an account admin to create a developer application.
Acquire app credentials
Navigate to the API menu item in the app's left navigation pane and select
OAuth Apps.Click the
Create Appbutton in the top right corner.You will be prompted with the Create Application dialog box. It is possible to configure separate credentials for sandbox and live production environments.

Specify the
Application NameandClient Secret Validitydetails.In the redirect URL section, input the required URL. For instance, local development URLs could be
http://localhost:3000/redirect, while URLs for live applications might resemblehttps://yourapp.com/redirect.The
Billing optionis used to reduce the document credits from the user's account or your account. If you choose theCharge my user's accountoption, any charges incurred from transactions will be billed directly to the user's account. If you prefer to handle the charges directly, select theCharge my accountoption, and the charges will be billed to your account.Then, proceed by clicking the
Savebutton.You will now be redirected to the App details page of your new API application.
You need to copy the Client ID and Client Secret Key and store them for future reference. These keys are required to configure the OAuth Client in your app.
Authorization code flow
In the authorization code grant flow, your client app integration receives consent from a person to act on their behalf before receiving an authorization code that can be exchanged for an access token, which is necessary to make API calls.
Obtain authorization code
The code is obtained from the BoldSign authentication server when the user reviews the information that the client is requesting either to approve or deny the authorization request.
To get this consent, you need to redirect the user to the following URI with your client credentials and a PKCE challenge. If you wish to maintain access to the token indefinitely, then it's necessary to include the offline_access scope to the parameter in the URI.
An example of a user consent screen page will appear, as shown in the following image.

| response_typestringRequired | Determines the type of authorization response. For the Authorization Code Flow, this must be set to code, indicating that the authorization server will return an authorization code to be exchanged for an access token. |
| client_idstringRequired | The client ID that is assigned to your OAuth2 application. |
| statestring | A random value of string will be provided back in the redirect URL response to keep track of the session or to prevent initiation from unsolicited flows. |
| scopestringRequired | Specify the space-delimited string of scopes. The scopes openid, profile, and email should be specified to limit and grant specific permissions to your access token. Include offline_access to receive a Refresh Token. The scopes required to access the BoldSign API endpoints will be available here. |
| redirect_uristringRequired | The redirect URI that your client wants to redirect to. The URI should also be configured in your OAuth2 application in the BoldSign. |
| code_challengestringRequired | A high entropy random string generated from the code_verifier. (PKCE, oauth). |
| code_challenge_methodstringRequired | Both plain and S256 challenge methods are supported. (PKCE, oauth). |
URI syntax
https://account.boldsign.com/connect/authorize
?response_type=code
&client_id=YOUR_CLIENT_ID
&state=YOUR_REQUEST_STATE
&scope=YOUR_SPACE_DELIMITED_SCOPES
&redirect_uri=YOUR_REDIRECT_URI
&code_challenge=YOUR_CODE_CHALLENGE
&code_challenge_method=S256
URI example
https://account.boldsign.com/connect/authorize
?response_type=code
&client_id=596f0268...
&state=YTc2MzVhM2ItNGYyY...
&scope=openid profile email offline_access BoldSign.Documents.All
&redirect_uri=https://yourapp.com/callback
&code_challenge=b7uDNmQ...
&code_challenge_method=S256
Your user will be prompted to sign in to their account and give consent for your app to make calls on their behalf. After selecting Allow, the website will be redirected to your configured redirect URI. An example is provided as follows.
Example response callback
https://yourapp.com/callback
?state=YTc2MzVhM2...
&code=1CB0E6C996B7...
&scope=openid profile email offline_access BoldSign.Documents.All
&session_state=7kjNqht7N...
Obtain access token
post https://account.boldsign.com/connect/token
After you have obtained the authorization code from the redirected URI query parameter code, you can use this code to exchange it for the access token by sending a POST request.
Also, the code_verifier that was used to compute the code_challenge in the previous authorization request is needed to successfully obtain the access token.
| grant_typestringRequired | The value should always be authorization_code while exchanging the authorization code for access token. |
| client_idstringRequired | The client ID allocated to your OAuth2 application. The value must be URL encoded before being sent to the server. The Basic Authorization pattern, which instead provides credentials in the Authorization header, is also supported. |
| client_secretstringRequired | The client secret that was generated for your OAuth2 application. The value must be URL encoded before being sent to the server. The Basic Authorization pattern, which instead provides credentials in the Authorization header, is also supported. |
| codestringRequired | The code that you obtained from the URL query parameter in the response to the authorize request. |
| redirect_uristringRequired | The same redirect URI that was sent in the authorize request. |
| code_verifierstringRequired | The code verifier that matches to the code_challenge used in the authorize request (PKCE, oauth). |
Request syntax
curl -X POST 'https://account.boldsign.com/connect/token' \
    --header 'Content-Type: application/x-www-form-urlencoded' \
    --data-urlencode 'grant_type=authorization_code' \
    --data-urlencode 'client_id=YOUR_CLIENT_ID' \
    --data-urlencode 'client_secret=YOUR_CLIENT_SECRET' \
    --data-urlencode 'code=YOUR_AUTH_CODE' \
    --data-urlencode 'redirect_uri=YOUR_REDIRECT_URI' \
    --data-urlencode 'code_verifier=YOUR_CODE_VERIFIER'
using var httpClient = new HttpClient();

var parameters = new List<KeyValuePair<string, string>>
{
    new KeyValuePair<string, string>("grant_type", "authorization_code"),
    new KeyValuePair<string, string>("client_id", "YOUR_CLIENT_ID"),
    new KeyValuePair<string, string>("client_secret", "YOUR_CLIENT_SECRET"),
    new KeyValuePair<string, string>("code", "YOUR_AUTH_CODE"),
    new KeyValuePair<string, string>("redirect_uri", "YOUR_REDIRECT_URI"),
    new KeyValuePair<string, string>("code_verifier", "YOUR_CODE_VERIFIER"),
};

using var request = new HttpRequestMessage()
{
    RequestUri = new Uri("https://account.boldsign.com/connect/token"),
    Content = new FormUrlEncodedContent(parameters),
    Method = HttpMethod.Post,
};

using var response = await httpClient
    .SendAsync(request)
    .ConfigureAwait(false);

var responseBody = await response.Content.ReadAsStringAsync().ConfigureAwait(false);
response.EnsureSuccessStatusCode();

var token = JsonConvert.DeserializeObject<Dictionary<string, string>>(responseBody);
var accessToken = token["access_token"];
var refreshToken = token["refresh_token"];
import json
import requests
import http

conn = http.client.HTTPSConnection("account.boldsign.com")
payload = "grant_type=authorization_code"+ \
"&client_id=YOUR_CLIENT_ID" + \
"&client_secret=YOUR_CLIENT_SECRET" + \
"&code=YOUR_AUTH_CODE" + \
"&redirect_uri=YOUR_REDIRECT_URI"  + \
"&code_verifier=YOUR_CODE_VERIFIER"

headers = {'content-type': "application/x-www-form-urlencoded"}

conn.request("POST", "/connect/token", payload, headers)
res = conn.getresponse()
data = res.read()
jsonData = json.loads(data.decode("utf-8"))
result=jsonData["access_token"]

print(result)
const axios = require('axios');
const response = await axios.post(

    ' https://app.boldsign.com/connect/token',

    new URLSearchParams({
        'grant_type': 'authorization_code',
        'client_id': 'YOUR_CLIENT_ID',
        'client_secret': 'YOUR_CLIENT_SECRET',
        'code': 'YOUR_AUTH_CODE',
        'redirect_uri': 'YOUR_REDIRECT_URI',
        'code_verifier': 'YOUR_CODE_VERIFIER'
    })
);
Example response
{
    "id_token": "eyJhbGciOiJSUzI1...",
    "access_token": "eyJhbGciOasd...",
    "expires_in": 3600,
    "token_type": "Bearer",
    "refresh_token": "7C09CCA...",
    "scope": "openid profile email offline_access BoldSign.Documents.All"
}
Refresh token
posthttps://account.boldsign.com/connect/token
After the access token expires, you can use the refresh token to obtain a fresh one. Refresh tokens may last longer than access tokens, depending on the OAuth app configuration (absolute or sliding). It's noteworthy that as long as the refresh token remains active, users are not obligated to log in again.
The refresh token supports two types of expiration: absolute and sliding expiration.

The absolute expiration, which is selected as the default type when creating an OAuth application. The refresh token will always expire after 30 days in this case, and there will be no option to extend this period once the token is generated. Once the refresh token has expired after 30 days, your application users must re-authenticate with BoldSign.
The sliding expiration for refresh tokens will also lapse after 30 days. However, it will be automatically extended by an additional 30 days each time you obtain a new access token using the refresh token as long as your current access token remains valid.
You can change the expiration mode at any time by going to the OAuth Apps page.
Important note: Refresh tokens can only be used once. When you use a refresh token to generate a new access token, you will also receive a new refresh token. The old refresh token is no longer valid.
| grant_typestringRequired | The value should always be refresh_token while using the refresh token to get a new access token. |
| client_idstringRequired | The client ID assigned to your OAuth2 application. Before being sent to the server, the value must be URL encoded. The Basic Authorization pattern, which instead provides credentials in the Authorization header, is also supported. |
| client_secretstringRequired | The client secret that was generated for your OAuth2 application. The value must be URL encoded before sent to the server. The Basic Authorization pattern, which instead provides credentials in the Authorization header, is also supported. |
| refresh_tokenstringRequired | The refresh token that you acquired from the token exchange. |
Request syntax
curl -X POST 'https://account.boldsign.com/connect/token' \
     --header 'Content-Type: application/x-www-form-urlencoded' \
     --data-urlencode 'grant_type=refresh_token' \
     --data-urlencode 'client_id=YOUR_CLIENT_ID' \
     --data-urlencode 'client_secret=YOUR_CLIENT_SECRET' \
     --data-urlencode 'refresh_token=YOUR_REFRESH_TOKEN'
using var httpClient = new HttpClient();

var parameters = new List<KeyValuePair<string, string>>
{
    new KeyValuePair<string, string>("grant_type", "refresh_token"),
    new KeyValuePair<string, string>("client_id", "YOUR_CLIENT_ID"),
    new KeyValuePair<string, string>("client_secret", "YOUR_CLIENT_SECRET"),
    new KeyValuePair<string, string>("refresh_token", "YOUR_REFRESH_TOKEN"),
};

using var request = new HttpRequestMessage()
{
    RequestUri = new Uri("https://account.boldsign.com/connect/token"),
    Content = new FormUrlEncodedContent(parameters),
    Method = HttpMethod.Post,
};

using var response = await httpClient
    .SendAsync(request)
    .ConfigureAwait(false);

var responseBody = await response.Content.ReadAsStringAsync().ConfigureAwait(false);
response.EnsureSuccessStatusCode();

var token = JsonConvert.DeserializeObject<Dictionary<string, string>>(responseBody);
var accessToken = token["access_token"];
var refreshToken = token["refresh_token"];
import json
import requests
import http

conn = http.client.HTTPSConnection("account.boldsign.com")
payload = "grant_type=refresh_token" + \
"&client_id=YOUR_CLIENT_ID" + \
"&client_secret=YOUR_CLIENT_SECRET "+ \
"&refresh_token=YOUR_REFRESH_TOKEN"

headers = {'content-type': "application/x-www-form-urlencoded"}
conn.request("POST", "/connect/token", payload, headers)
res = conn.getresponse()
data = res.read()
jsonData = json.loads(data.decode("utf-8"))
result=jsonData["access_token"]

print(result)
const axios = require('axios');

const response = await axios.post(
    'https://account.boldsign.com/connect/token',
    new URLSearchParams({
        'grant_type': 'refresh_token',
        'client_id': 'YOUR_CLIENT_ID',
        'client_secret': 'YOUR_CLIENT_SECRET',
        'refresh_token': 'YOUR_REFRESH_TOKEN'
    })
);
Example response
{
    "id_token": "eyJhbGdfiJSUzI1N...",
    "access_token": "eyJhbGciOiJSUzI1N...",
    "expires_in": 3600,
    "token_type": "Bearer",
    "refresh_token": "D35CC2B09F...",
    "scope": "openid profile email BoldSign.Documents.All offline_access"
}
Client credential flow
posthttps://account.boldsign.com/connect/token
The client credential flow obtains the access token as a specific user throughout the lifetime. This is different from acting on behalf of another user, like in the Authorization code flow. This flow is often used in cases where automation is involved without directly requiring user interaction. For example, an organization needs to send out onboarding documents for its employees on hiring. This process can be automated using the HR account's client credentials.
The client credential flow does not include a refresh token, and a new access token has to be requested when the old one expires.
Request parameters
| grant_typestringRequired | The value should always be client_credentials while using this flow. |
| client_idstringRequired | The client ID assigned to your OAuth2 application. The value must be URL encoded before being sent to the server. The Basic Authorization pattern, which instead provides credentials in the Authorization header, is also supported. |
| client_secretstringRequired | The client secret generated for your OAuth2 application. The value must be URL encoded before being sent to the server. The Basic Authorization pattern, which instead provides credentials in the Authorization header, is also supported. |
| scopestringRequired | Specify the space-delimited string of scopes. The scopes openid, profile, and email should be specified to limit and grant specific permissions to your access token. Include offline_access to receive a Refresh Token. The scopes required to access the BoldSign API endpoints will be available here. If left empty, all scopes will be granted when the access token is issued. |
Request syntax
curl -X  POST 'https://account.boldsign.com/connect/token' \
     --header 'Content-Type: application/x-www-form-urlencoded' \
     --data-urlencode 'grant_type=client_credentials' \
     --data-urlencode 'client_id=YOUR_CLIENT_ID' \
     --data-urlencode 'client_secret=YOUR_CLIENT_SECRET' \
     --data-urlencode 'scope=BoldSign.Documents.All'
using var httpClient = new HttpClient();

var parameters = new List<KeyValuePair<string, string>>
{
    new KeyValuePair<string, string>("grant_type", "client_credentials"),
    new KeyValuePair<string, string>("client_id", "YOUR_CLIENT_ID"),
    new KeyValuePair<string, string>("client_secret", "YOUR_CLIENT_SECRET"),
    new KeyValuePair<string, string>("scope", "BoldSign.Documents.All"),
};

using var request = new HttpRequestMessage()
{
    RequestUri = new Uri("https://account.boldsign.com/connect/token"),
    Content = new FormUrlEncodedContent(parameters),
    Method = HttpMethod.Post,
};

using var response = await httpClient
    .SendAsync(request)
    .ConfigureAwait(false);

var responseBody = await response.Content.ReadAsStringAsync().ConfigureAwait(false);
response.EnsureSuccessStatusCode();

var token = JsonConvert.DeserializeObject<Dictionary<string, string>>(responseBody);
var accessToken = token["access_token"];
import json
import requests
import http

conn = http.client.HTTPSConnection("account.boldsign.com")
payload = "grant_type=client_credentials" + \
"&client_id=YOUR_CLIENT_ID" + \
"&client_secret=YOUR_CLIENT_SECRET" + \
"&scope=BoldSign.Documents.All"

headers = {'content-type': "application/x-www-form-urlencoded"}

conn.request("POST", "/connect/token", payload, headers)
res = conn.getresponse()
data = res.read()
jsonData = json.loads(data.decode("utf-8"))
result=jsonData["access_token"]

print(result)
const axios = require('axios');

const response = await axios.post(
    'https://account.boldsign.com/connect/token',
    new URLSearchParams({
        'grant_type': 'client_credentials',
        'client_id': 'YOUR_CLIENT_ID',
        'client_secret': 'YOUR_CLIENT_SECRET',
        'scope': 'BoldSign.Documents.All'
    })
);
Example response
{
    "access_token": "eyJhbGciOi...",
    "expires_in": 3600,
    "token_type": "Bearer",
    "scope": "BoldSign.Documents.All"
}
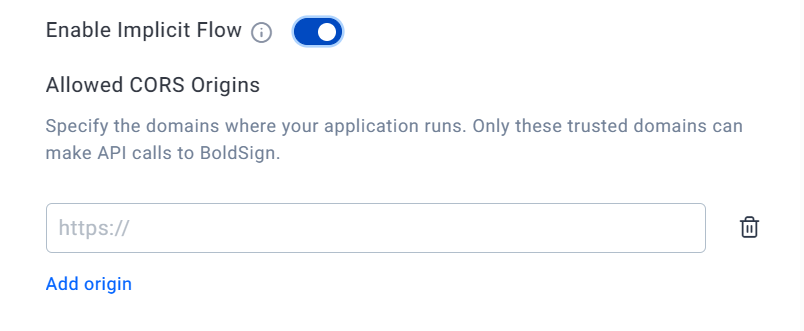
Implicit flow
The implicit flow is best suited for client-side applications needing direct user interaction for quick resource access. It streamlines token acquisition by bypassing server for token exchange. Unlike client credentials and authorization code flows, the implicit flow operates without a client secret.
This approach is particularly useful for single-page web apps and mobile applications. However, developers must exercise caution in token storage within browsers or mobile environments. When implementing this flow, it's crucial to follow security best practices to protect the access token to avoid common attacks like XSS.
You can specify which origins (CORS) can access resources by adding them here when creating the OAuth2 application.
| response_typestringRequired | The value should be always token while using this flow. |
| client_idstringRequired | The client ID that is assigned to your OAuth2 application. |
| scopestringRequired | Specify the space-delimited string of scopes. The scopes openid, profile, and email should be specified to limit and grant specific permissions to your access token. The scopes required to access the BoldSign API endpoints will be available here. |
| redirect_uristringRequired | The redirect uri that your client wants to redirect to. The URI should also been configured in your OAuth2 application in the BoldSign. |
| statestring | A random value of string will be provided back in the redirect URL response to keep track of the session or to prevent initiation from unsolicited flows. |
| noncestringRequired | A randomly generated string that can be used to associate a client session with an ID token and to mitigate replay attacks. The nonce value is returned in the ID token and must match the value provided in the request. |
URI syntax
https://account.boldsign.com/connect/authorize
?response_type=id_token token
&client_id=YOUR_CLIENT_ID
&state=YOUR_REQUEST_STATE
&scope=YOUR_SPACE_DELIMITED_SCOPES
&redirect_uri=YOUR_REDIRECT_URI
&nonce=YOUR_NONCE_VALUE
URI example
https://account.boldsign.com/connect/authorize?response_type=id_token token&client_id=e36fdf2b-xxxx-xxxx-xxxx-f8510d2dfde4&state=YTc2MzVhM2ItNGYyYYTc2MzVhM2ItNGYyYYTc2MzVhM2ItNGYyY&scope=BoldSign.Documents.All BoldSign.Templates.All&redirect_uri=https://yourapp.com/callback&nonce=dGhpcy1pc19hX25vbmNlX3ZhbHVl
Your user will be prompted to sign in to their account and give consent for your app to make calls on their behalf. After selecting Allow, the website will be redirected to your configured redirect URI. An example is provided below.
Example response callback
https://yourapp.com/callback/#id_token=eyJhbGciO...&access_token=eyJhbGciOi...
&token_type=Bearer
&expires_in=3600
&scope=BoldSign.Documents.All%20BoldSign.Templates.All
&state=YTc2MzVhM2ItNGYyYYTc2MzVhM2ItNGYyYYTc2MzVhM2ItNGYyY
Usage
To make an HTTP request with OAuth2 access token, the request header must include the Authorization. Use the access token in the following format.
curl -X GET 'https://api.boldsign.com/v1/document/list' -H 'Authorization: Bearer eyJhbGci...'
var configuration = new Configuration();

// set your OAuth2 Access Token for authentication.
configuration.SetBearerToken("eyJhbGciOiJSUz...");

var apiClient = new ApiClient(configuration);
var documentClient = new DocumentClient(apiClient);
var documents = documentClient.ListDocuments(1, 10);
import requests
url = "https://api.boldsign.com/v1/document/list"

payload={}
headers = {
  'Authorization': 'Bearer eyJhbGciOiJSUz...'
}

response = requests.request("GET", url, headers=headers, data=payload)

print(response.text)
const axios = require('axios');

const response = await axios.get('https://api.boldsign.com/v1/document/list', {
    headers: {
        'Authorization': 'Bearer eyJhbGciOiJSUz...'
    }
});