

BoldSign AI Assistant
Chat with the BoldSign AI AssistantAPI key
The API key authentication is a basic authentication mechanism. It is easy and can be used as an alternative to OAuth for connecting to and authenticating BoldSign's API services. However, make sure that API is part of your plan for generating the API Key.
You can generate up to 4 API keys at once. The generated API keys can be either in the Live or Sandbox environment but no more than 2 in a single environment.
By default, all the scopes will be included when you generate an API key. Currently, this is not customizable.
Generate API key
Navigate to the API menu item in the app's left navigation pane and select
API Key.
Click the
Generate API Keybutton.You will be prompted with the
Generate API Keydialog.
Proceed by clicking the
Generate Tokenbutton.Then, copy the API key needed to configure in the HTTP request header from your application.

Usage
To make an HTTP request with API Key, the request header must include the X-API-KEY. Use the generated API key in the following format.
curl -X GET 'https://api.boldsign.com/v1/document/list' -H 'X-API-KEY: {your API key}'
var apiClient = new ApiClient("https://api.boldsign.com", "Your_API_Key");

var templateClient = new TemplateClient(apiClient);

var templateList = templateClient.ListTemplates(1);
import boldsign

configuration = boldsign.Configuration(host = "https://api.boldsign.com", api_key="YOUR_API_KEY")

with boldsign.ApiClient(configuration) as api_client:

    template_api = boldsign.TemplateApi(api_client)
    template_list = template_api.list_templates(page=1)
<?php require_once "vendor/autoload.php";

use BoldSign\Configuration;
use BoldSign\Api\TemplateApi;

$config = new Configuration();
$config->setHost('https://api.boldsign.com');
$config->setApiKey('YOUR_API_KEY');

$template_api = new TemplateApi($config);
$template_list = $template_api->listTemplates($page = 1);
ApiClient client = Configuration.getDefaultApiClient();
client.setBasePath("https://api.boldsign.com");
client.setApiKey("YOUR_API_KEY");

TemplateApi templateApi = new TemplateApi(client);

int page = 1;
TemplateRecords templateList = templateApi.listTemplates(page, null, null, null, null, null, null, null, null, null);
import { TemplateApi } from "boldsign";

const templateApi = new TemplateApi("https://api.boldsign.com");
templateApi.setApiKey("YOUR_API_KEY");

const templateList = templateApi.listTemplates(1);

API key validity
When creating an API key in BoldSign, you can set an expiration date by enabling the Token Validity option.
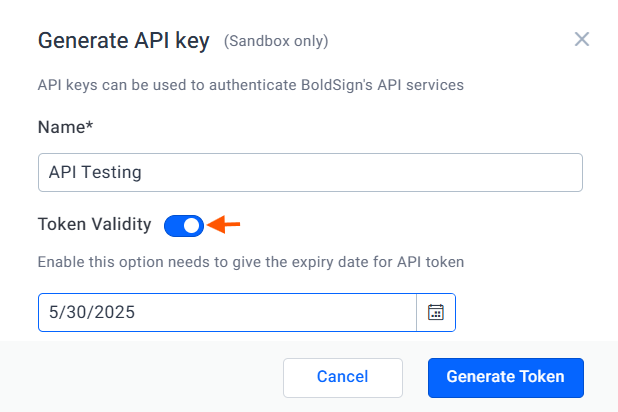
Note: If no expiry date is set, the API key will remain valid until it is manually deleted. Once deleted, the API key will expire automatically and can no longer be used.